A popular and convenient broadcasting tool you can use to create your events on Peatix Live is the tried and tested StreamYard.
Similar to OBS, this is another user friendly option for you to livestream events such as performances and webinars onto Peatix Live.
To use StreamYard effectively, you will first need to select the ‘Custom RTMP’ distribution. This will allow you to broadcast directly onto your Peatix Live event page. By enrolling in StreamYard’s Basic plan of USD$20 a month, you will be able to access this ‘Custom RTMP’ option
Once you have purchased the StreamYard Basic plan, follow these simple steps to configure your Custom RTMP settings and set up your broadcast operations.
STEP 1: Login to StreamYard, click the blue button “Create A Broadcast” on the login screen.
STEP 2: Upon clicking the “Create A Broadcast” button, a pop-up window “Broadcast to” will be displayed. Click the “+ (plus)” mark.
STEP 3: Click the “+ (plus)” mark to display the selection items. Select “Custom RTMP”.
STEP 4: Once you select “Custom RTMP”, a pop-up screen will show “Add a custom RTMP destination”. Fill in the blanks to set the “RTMP server URL”, “Stream key” and “Nickname” items respectively. Do NOT tick the checkbox at the end that says “I have a server password (uncommon)”.
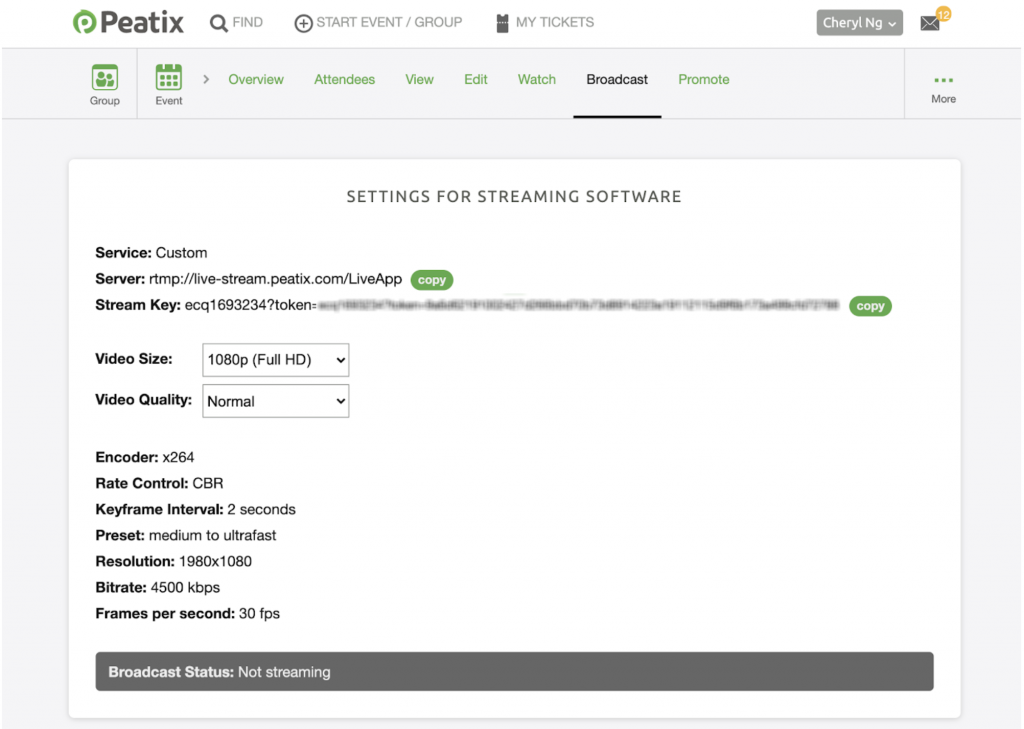
STEP 5: On your Peatix Event page settings, select the Broadcast tab and you will see a screen that displays the items required for setting when live-streaming from StreamYard to Peatix Live.
Copy the “Server” information and paste it in the StreamYard’s “RTMP server URL” column.
Copy the “Stream Key” and paste it into StreamYard’s “Stream Key” column.
Finally, set a “Nickname” on StreamYard. When ready, click Add RTMP server on StreamYard

STEP 6: Once done, you will immediately see the screen “Broadcast to”
Enter the title of the live broadcast in the “Title” field and click the “Create broadcast” button.
STEP 7: Specify the microphone and camera you would like StreamYard to access and add your preferred “Display Name”. Once done, click the “Enter studio” button. This completes the Custom RTMP settings.
STEP 8: Next, you will arrive at StreamYard’s Broadcast Studio. This is where you will conduct and coordinate your livestream content. Select the “Cam/Mic” button on the panel at the bottom, to open the settings screen.
STEP 9: Select “General” on the left side panel, and under Broadcast Quality, you can change the resolution of the live streamed video. By default, it is set to “High Definition (720p)”, but you can also select “Full High Definition (1080p)”, which has a higher resolution. This setting can be altered even while you are in the midst of your livestream. If and when you feel your Internet communication speed is slow, select the “High Definition (720p)”. This completes your broadcast operations setup.
STEP 10: Return to the Broadcast Studio and once you are ready, click the blue button “Go Live” displayed in the upper left corner and your live stream will begin!
Start your online event with Peatix Live, using StreamYard today. For more information, visit https://services.peatix.com/peatixlive

